Coopermatics recently undertook a large coolant oil tank cleaning project at a leading tool manufacturing facility located in Ohio, US.
Overview
The customer is a leading player in tool manufacturing with a wide presence across the globe.
Their coolant tank had a holding capacity of 18,000 gallons and was located in the basement. To put that into perspective, the tank’s size was equivalent to that of a 40 feet shipping container. The coolant tank served as the common sump for 3 pre-coat filtration systems (CFC-90A) that were connected to it. With over 25 years of operation, the coolant tank had accumulated exorbitant amounts of sludge that had settled in the bottom of the tank. The client approached us to take on the task of carrying out a thorough clean-up of their coolant tank.
Challenge
Our job was to perform a complete clean-up of the entire coolant tank. The scope of the work was as follows:
- Emptying the coolant oil in the basement tank.
- Removing sludge deposits and thoroughly cleaning the base of the tank.
- Re-filling the tank with filtered coolant oil.
The entire project took over 2 days to complete.
Process
We conducted a pre-evaluation at the customer’s site to inspect the coolant tank and the sludge level accumulated at the base of the tank. With 3 inch deep level of sludge in the tank, we proposed a clean-up plan to the customer.
- The project began early on day 1 with the arrival of the frac tank at the site.
- Once at the site, we conducted a round of inspections on the site and got external prep work done. This included keeping the vacuum truck, frac tank, suction pumps, hoses, and cartridge filters on standby.
- After initial setup, our team hooked up and connected the 120 ft hose between the tank and the external frac tank (Refer to picture 2).
- We proceeded to transfer the coolant oil present in the basement tank to the frac tank to empty the customer’s sump. A vacuum pump was used to suck out the coolant oil and transfer it to the frac tank (Refer to picture 3). It took about three hours to completely drain out the oil from the tank.
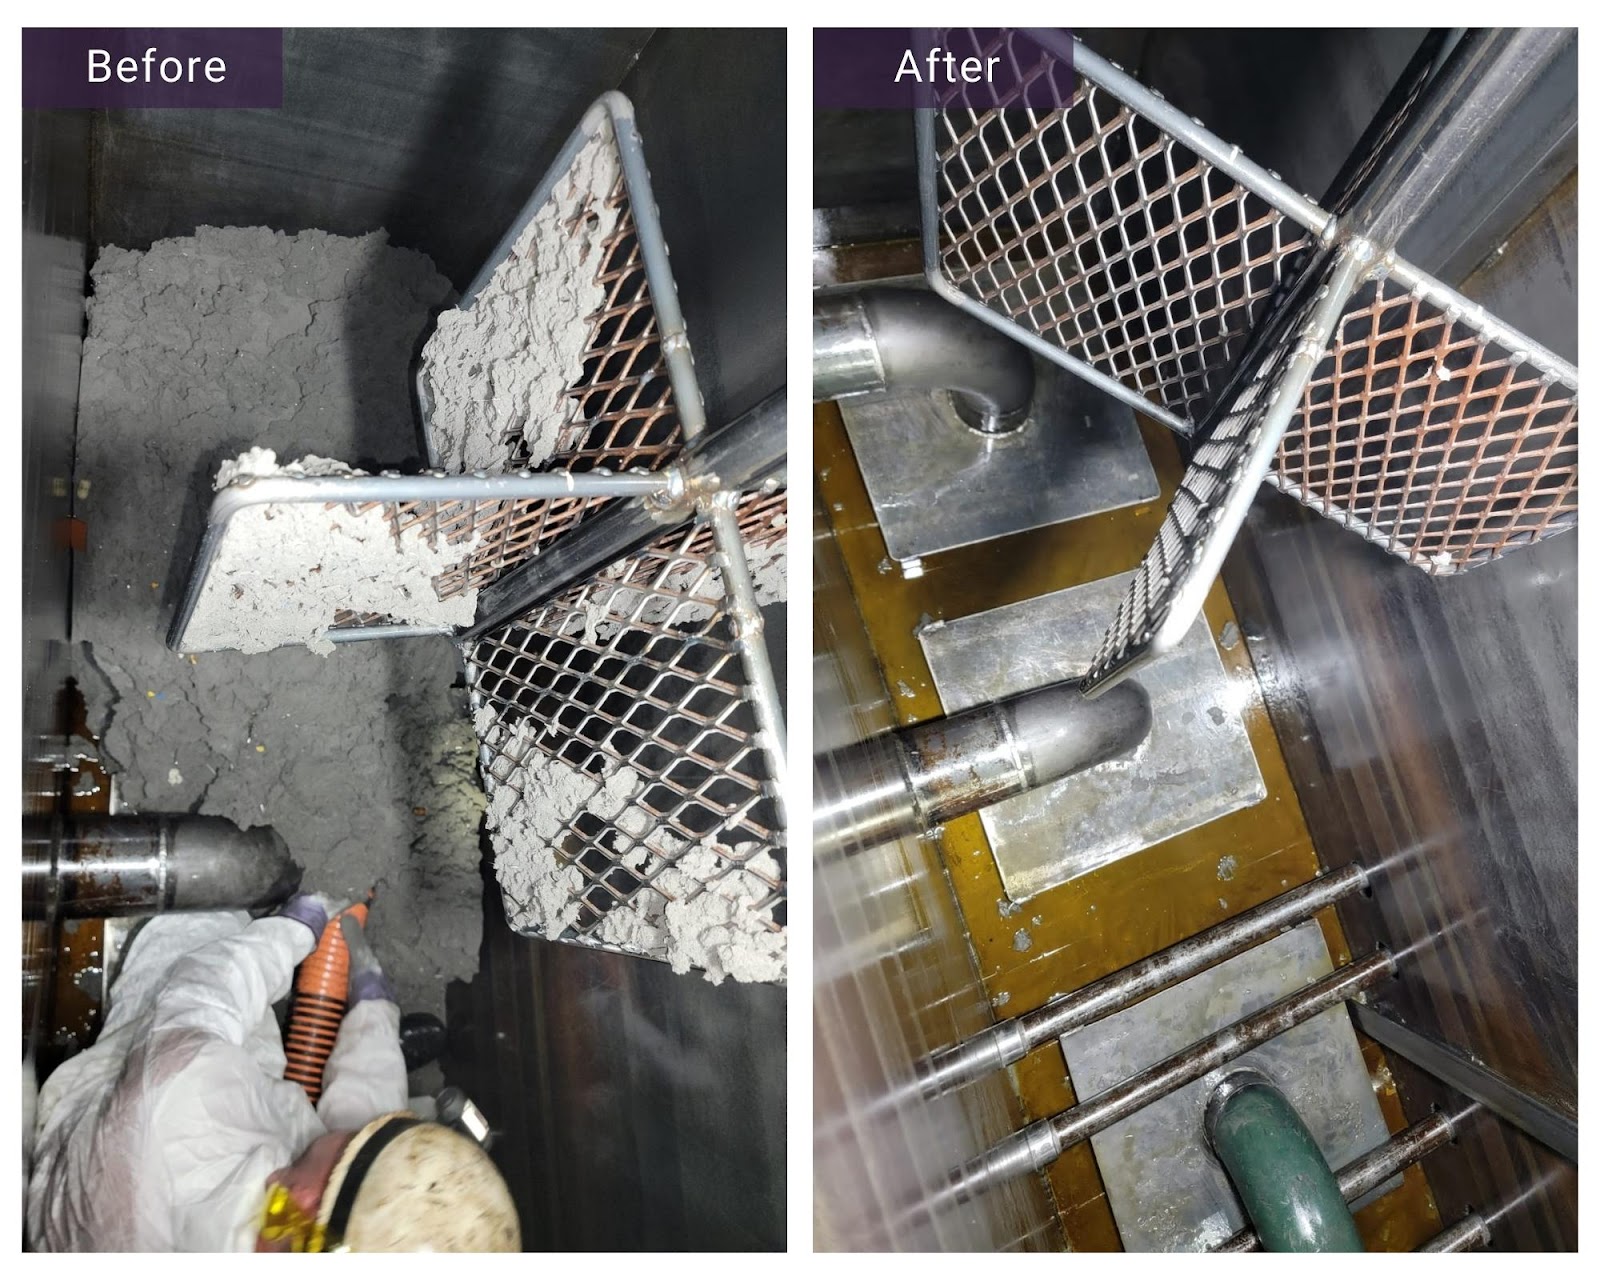
- Emptying the tank revealed large amounts of sludge deposits. (Refer to picture 4)
- It was time to clean the tank. We made preparations and took the necessary safety precautions before sending our staff into the tank. We attached a harness to our staff and lowered him to the bottom of the tank to get started with removing the sludge (Refer to picture 6).
- With the help of a suction pump, we were able to suck out the sludge/deposits from the base of the tank and transfer it to the vacuum truck (Refer to picture 5). The sludge removal process took over 5 to 6 hours and we were able to remove all the sludge and other deposits in the tank (refer to picture 7), bringing day one to a close.
- On day 2, we made preparations and proceeded to transfer the dirty coolant oil from the frac tank back into the clean basement tank. During the transfer, we ran the coolant oil through a cartridge filter to clean the dirty oil (refer to picture 8). By performing this task, we were able to remove all impurities and swarf present in the old coolant and refill the customer’s tank with clean coolant oil (refer to picture 9). The cartridges in the filter were replaced every hour.
- After about 5 to 6 hours of completing the transfer, we cleaned the frac tank.
- We started the filtration systems and monitored them to ensure they were running as normal.
Conclusion
Coopermatics was able to perform the task of cleaning the customer’s coolant tank successfully on time and without any trouble.

Coolant tank cleaning is one of the most overlooked tasks in CNC machining operations. Keeping your coolant tank clean inside is necessary. Apart from health issues, clean tanks also save on filter cleaning or replacing, and machine failures.
Even if you have well-installed filtration systems in place, over time, material can build up at the bottom of your coolant tank, which can go unnoticed. Chips and fines will sink to the bottom and begin to decay, creating a layer of thick sludge. If not addressed properly, this sludge can contaminate your coolant, becoming a breeding ground for bacterial and fungal growth. This in turn will contaminate pumps, filters or even worse – the entire filtration system, affecting your tools, equipment and overall production operation.
Preventive Maintenance for Coolant Tanks
Prevention is always better than cure. This applies to sludge in a tank as well. Without taking some measures of prevention, it’s almost guaranteed that your tank will build up a layer of sludge on the bottom of the tank.
For large capacity tanks like our customer’s, we recommend cleaning your coolant tank at least once in 5 to 10 years. For smaller operating facilities, it is advised to clean coolant tanks regularly. Take the time to take the whole tank out, drain it, scrape it clean, and then refill it. A sump cleaner can make this task easier and more productive. Cleaning time can be reduced 50 to 80 percent with an effective coolant sump cleaner.
If you have any questions on what maintenance needs to be done on your filtration equipment or coolant tanks or would like to schedule preventive maintenance, you can reach out to us.